How to Transition from XML (Android View) to Jetpack Compose ViewMoving from XML to Jetpack Compose helps developers write cleaner, faster and more modern UI code — essential for staying up to date with Android’s best practices.
Published

For many years, Android View (XML) was the sole way of building layouts in Android. In 2021, Google released Jetpack Compose, which is now the method most recommended by Google for building layouts. Android View uses the syntax of XML; Compose uses a syntax similar to React.
Right now XML is still widely used for several reasons:
- Longevity: Jetpack Compose is very new, while the XML approach has been used since the creation of Android frameworks, making it well-established and familiar for many developers.
- Developer familiarity: More developers know Android XML than Jetpack Compose.
- Legacy projects: Many existing Android projects are built using XML layouts, so understanding it is still a necessity.
But Jetpack Compose offers a lot of advantages over XML:
- Declarative UI: It’s easier to describe and understand how the UI works.
- Kotlin-First: Compose is built using Kotlin, so it leverages language features and makes performance better.
- Preview and tooling: Compose offers powerful preview features in Android Studio, allowing developers to see UI changes in real time without running the app.
- Simplified Code: Compose requires less code compared to XML layouts, resulting in more concise and readable UI definitions.
In the ideal world, we could transform all of our XML code to Jetpack Compose to harness the benefits of the newer methodology. In reality this transition can create a lot of problems, so it must be done slowly.
Below are instructions for managing this gradual transition using both approaches at the same time. This way you can leverage all the benefits of Jetpack Compose while simultaneously delivering features for your clients.
Development#
Here’s a simple login screen built using the old XML approach:
<?xml version="1.0" encoding="utf-8"?>
<LinearLayout xmlns:android="<http://schemas.android.com/apk/res/android>"
    android:id="@+id/rootLayout"
    android:layout_width="match_parent"
    android:layout_height="match_parent"
    android:orientation="vertical"
    android:padding="24dp"
    android:gravity="center"
    android:background="#FFFFFF">

    <EditText
        android:id="@+id/emailInput"
        android:layout_width="match_parent"
        android:layout_height="wrap_content"
        android:hint="@string/email"
        android:inputType="textEmailAddress"
        android:padding="12dp"
        android:background="@android:drawable/edit_text" />

    <EditText
        android:id="@+id/passwordInput"
        android:layout_width="match_parent"
        android:layout_height="wrap_content"
        android:hint="@string/password"
        android:inputType="textPassword"
        android:padding="12dp"
        android:layout_marginTop="12dp"
        android:background="@android:drawable/edit_text" />

    <Button
        android:id="@+id/loginButton"
        android:layout_width="match_parent"
        android:layout_height="wrap_content"
        android:text="@string/login"
        android:layout_marginTop="20dp"
        android:backgroundTint="@android:color/holo_blue_light"
        android:textColor="#FFFFFF" />

</LinearLayout>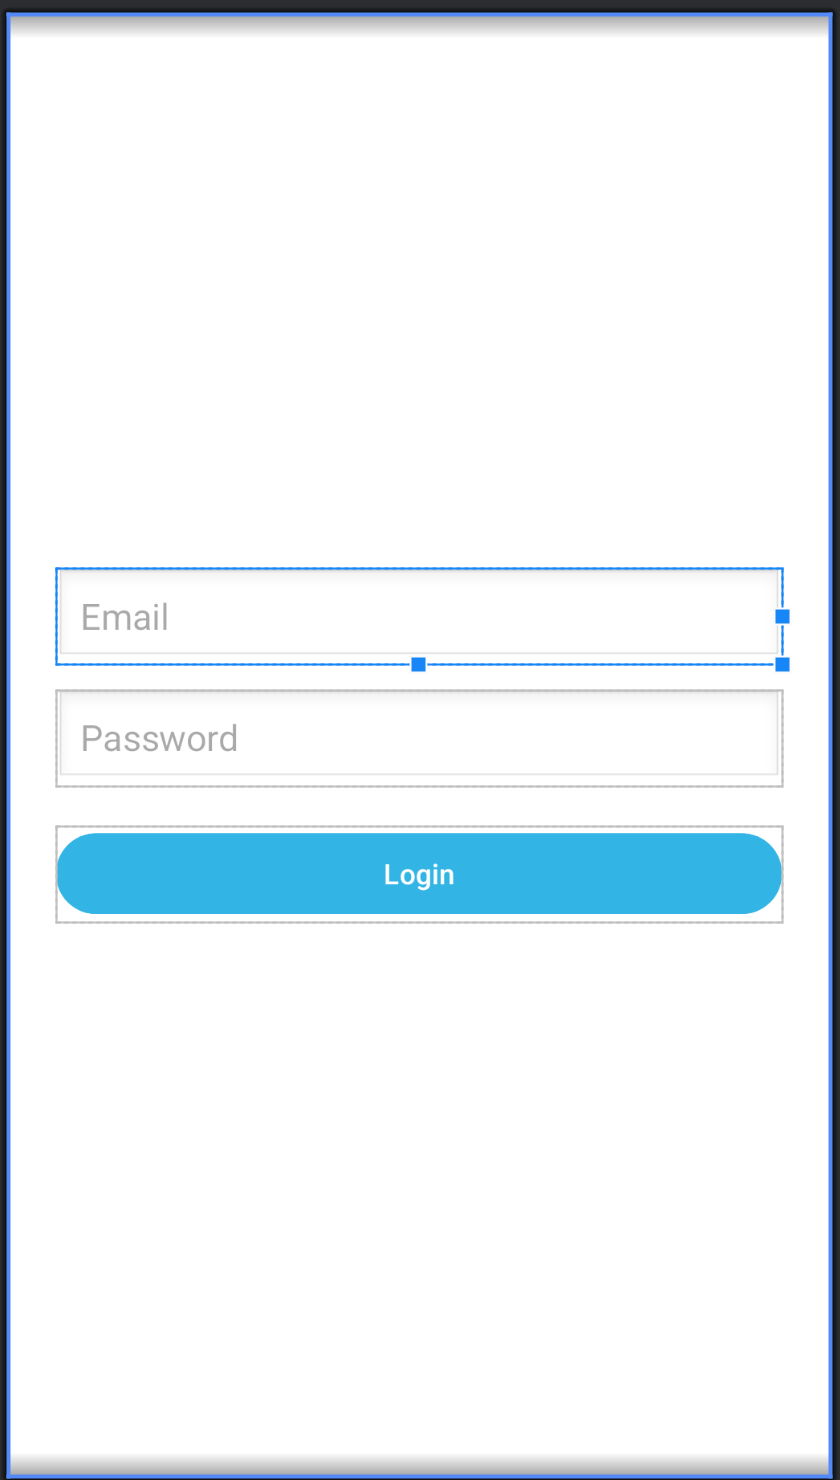
Let’s say that the designers of the application requested an alert to inform users that their password is incorrect. This alert will be used throughout the app, making it the perfect opportunity to start the migration to Jetpack Compose.
Open your Android Studio and let’s start with the Compose alert component.
- First create a Kotlin file:
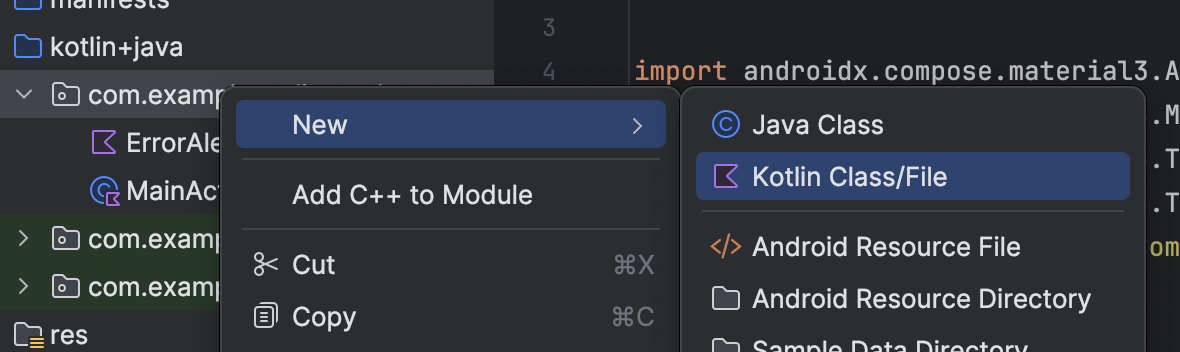
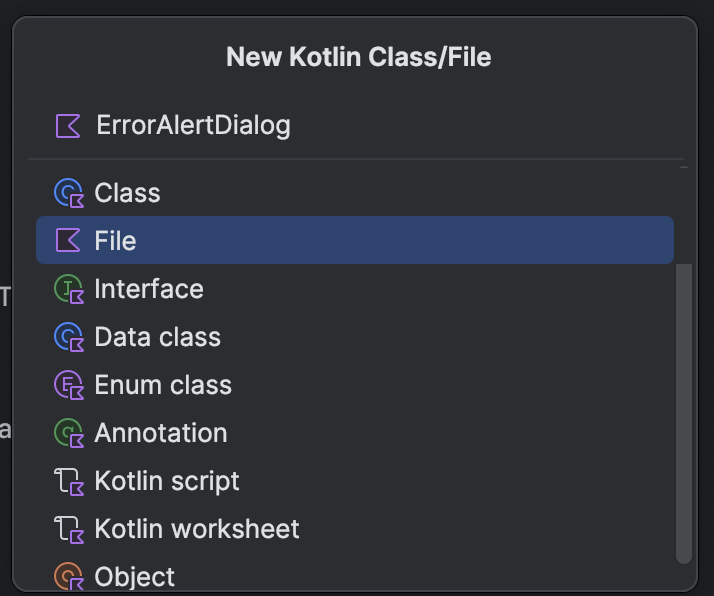
2. Select the option “File” and for the name of the component, you can put “ErrorAlertDialog”.
3. Copy and paste the code below:
package com.example.xmljetpackcomposetransition

import android.util.Log
import androidx.compose.foundation.background
import androidx.compose.foundation.layout.Box
import androidx.compose.foundation.layout.Column
import androidx.compose.foundation.layout.Spacer
import androidx.compose.foundation.layout.fillMaxSize
import androidx.compose.foundation.layout.fillMaxWidth
import androidx.compose.foundation.layout.height
import androidx.compose.foundation.layout.padding
import androidx.compose.foundation.layout.size
import androidx.compose.foundation.layout.width
import androidx.compose.material3.AlertDialog
import androidx.compose.material3.Button
import androidx.compose.material3.ButtonDefaults
import androidx.compose.material3.MaterialTheme
import androidx.compose.material3.Text
import androidx.compose.material3.TextButton
import androidx.compose.runtime.Composable
import androidx.compose.ui.Alignment
import androidx.compose.ui.Modifier
import androidx.compose.ui.graphics.Color
import androidx.compose.ui.platform.testTag
import androidx.compose.ui.text.style.TextAlign
import androidx.compose.ui.tooling.preview.Preview
import androidx.compose.ui.unit.dp

@Composable
fun ErrorAlertDialog(
    message: String,
    onDismiss: () -> Unit,
) {
    Box(
        modifier = Modifier
            .fillMaxWidth()
            .padding(16.dp)
    ) {
        Column(horizontalAlignment = Alignment.CenterHorizontally,  modifier = Modifier.fillMaxWidth()) {
            Text(
                text = message,
                color = Color.Red,
                style = MaterialTheme.typography.bodyLarge,
                textAlign = TextAlign.Center
            )
            Spacer(modifier = Modifier.height(12.dp))
            Button(onClick = onDismiss,    colors = ButtonDefaults.buttonColors(
                containerColor = Color.Red,
                contentColor = Color.White
            )) {
                Text("OK")
            }
        }
    }
}

@Preview(showBackground = true)
@Composable
fun PreviewErrorAlertDialog() {
    MaterialTheme {
        ErrorAlertDialog(
            message = "This is a preview error.",
            onDismiss = {} // No-op for preview
        )
    }
Integration with the Existing XML Component#
First you have to add the ComposeView in the XML component like it’s shown here:
<?xml version="1.0" encoding="utf-8"?>
<LinearLayout xmlns:android="<http://schemas.android.com/apk/res/android>"
    android:id="@+id/rootLayout"
    android:layout_width="match_parent"
    android:layout_height="match_parent"
    android:orientation="vertical"
    android:padding="24dp"
    android:gravity="center"
    android:background="#FFFFFF">

    <EditText
        android:id="@+id/emailInput"
        android:layout_width="match_parent"
        android:layout_height="wrap_content"
        android:hint="@string/email"
        android:inputType="textEmailAddress"
        android:padding="12dp"
        android:background="@android:drawable/edit_text" />

    <EditText
        android:id="@+id/passwordInput"
        android:layout_width="match_parent"
        android:layout_height="wrap_content"
        android:hint="@string/password"
        android:inputType="textPassword"
        android:padding="12dp"
        android:layout_marginTop="12dp"
        android:background="@android:drawable/edit_text" />

    <Button
        android:id="@+id/loginButton"
        android:layout_width="match_parent"
        android:layout_height="wrap_content"
        android:text="@string/login"
        android:layout_marginTop="20dp"
        android:backgroundTint="@android:color/holo_blue_light"
        android:textColor="#FFFFFF" />
    <!-- Add this -->
    <androidx.compose.ui.platform.ComposeView
        android:id="@+id/composeView"
        android:layout_width="match_parent"
        android:layout_height="wrap_content"
        android:visibility="gone" />
</LinearLayout>
In the MainActivity file you just have to add the following code. There are some comments in the in the code for better understanding of what’s happening.
package com.example.xmljetpackcomposetransition

import android.os.Bundle
import android.util.Log
import android.view.View
import android.widget.Button
import android.widget.EditText
import android.widget.Toast
import androidx.activity.enableEdgeToEdge
import androidx.appcompat.app.AppCompatActivity
import androidx.compose.material3.MaterialTheme
import androidx.compose.ui.platform.ComposeView
import androidx.compose.ui.platform.ViewCompositionStrategy
import androidx.core.view.ViewCompat
import androidx.core.view.WindowInsetsCompat

class MainActivity : AppCompatActivity() {

    private lateinit var emailInput: EditText
    private lateinit var passwordInput: EditText
    private lateinit var loginButton: Button
    private lateinit var composeView: ComposeView

    override fun onCreate(savedInstanceState: Bundle?) {
        super.onCreate(savedInstanceState)
        setContentView(R.layout.activity_main)
        enableEdgeToEdge()
        emailInput = findViewById(R.id.emailInput)
        passwordInput = findViewById(R.id.passwordInput)
        loginButton = findViewById(R.id.loginButton)

       /*
        This part you're setting the component you created
        as a content of your XML compose view, very straight forward.
       */
        composeView = findViewById(R.id.composeView)

        composeView.setContent {
            MaterialTheme {
                ErrorAlertDialog(
                    message = "Password cannot be empty.",
                    onDismiss = {
                        composeView.visibility = View.GONE
                    }
                )
            }
        }

        loginButton.setOnClickListener {
            val password = passwordInput.text.toString()

            if (password.isBlank()) {
               /*
               Here I'm setting the compose view visibility to visible,
               so the user will see the compose view component.
               */
                showComposeErrorDialog()
            } else {
                Toast.makeText(this, "Login successful", Toast.LENGTH_SHORT).show()
            }
        }

    }

    private fun showComposeErrorDialog() {
        composeView.visibility = View.VISIBLE
    }
}
Your application should work like this:
And that’s it! By applying this methodology, you can start to enjoy the benefits of Jetpack Compose while working in an XML project.
Originally published on Loka Engineering on Medium.
Tags